6. クラウドアプリ開発
6.1. クラウドで実行するプログラムをPython言語で入力
クラウドアプリは、Python(プログラミング言語)によって動作します。 テキストエディタを利用して、次の二つのファイルを作成します。
クラウドアプリ(ファイル名:~.py)
クラウドコンピュータで実行されるプログラムです。 My-IoTが持つ機能を活用するためのAPIが用意されており、本アプリケーションから呼び出して利用します。
クラウドフォーメーション(ファイル名:~.yaml)
クラウドアプリをクラウドコンピュータにインストールするために必要な設定ファイルです。 YAML(ヤムル)と呼ぶデータ形式で記述します。
これらのファイル記述に精通するには慣れが必要です。 本初級編では、事前に用意したファイルを使い、まずは記述方法や使い方に慣れていきます。
「3. セットアップ」でダウンロードしたクラウドアプリ(cloudapp.py)を以下に示します。
import json
import boto3
import os
from datetime import datetime
from dateutil import tz

MQTT_API_NAME = (os.environ.get("MQTT_LAMBDA"))
ES_ACCESS_LAMBDA = (os.environ.get('ES_ACCESS_LAMBDA'))
TENANT_ID = (os.environ.get('TENANT_ID'))

def make_response(code, body):
    response = {
        'statusCode': code,
        "headers": {"Content-Type": "application/json", "Access-Control-Allow-Origin": "*"},
        'body': json.dumps(body),
        "isBase64Encoded": False
    }
    return response

def dictHasKey(dictionary, key):
    return isinstance(dictionary, dict) and key in dictionary

def get_param_from_event(event, paramName):
    if dictHasKey(event, 'queryStringParameters'):
        if dictHasKey(event['queryStringParameters'], paramName):
            return event['queryStringParameters'][paramName]
    return ''

def make_index_name(event):
    JST = tz.gettz('Asia/Tokyo')
    date = datetime.now(JST).strftime('%Y.%m.%d')
    # インデックス名(テナントID_YYYY.MM.DD)を生成
    index_name = '{}_{}'.format(TENANT_ID, date)
    return index_name

def make_query(event):
    query = {
        'query': {
            'bool': {
                'should': []
            }
        },
        'sort': [{'timestamp': 'desc'}],
    }
    # クエリにコネクタIDを設定
    connector_query = {
        'match': {
            'connectorID': get_param_from_event(event, 'connectorId')
        }
    }
    query['query']['bool']['should'].append(connector_query)
    # クエリにページネーション用のページサイズとオフセットを設定
    # 最新のデータを1件取得
    query['from'] = 0
    query['size'] = 1
    # 生成したクエリを返す
    return query

def lambda_handler(event, context):
    # 入力チェック
    index_name = make_index_name(event)
    # クエリ
    query = make_query(event)
    # ペイロード
    payload = {
        'method': 'Get',
        'index': index_name,
        'query': query
    }
    # ESにアクセス
    res = boto3.client('lambda').invoke(
        FunctionName=ES_ACCESS_LAMBDA,
        InvocationType='RequestResponse',
        Payload=json.dumps(payload)
    )
    # レスポンス
    response = json.loads(res['Payload'].read())
    # 最新の環境データを取得
    env = response["body"]["result"]["hits"]["hits"][0]["_source"]
    temp = env["temp"]
    humd = env["humd"]
    # 不快指数を計算
    # https://ja.wikipedia.org/wiki/%E4%B8%8D%E5%BF%AB%E6%8C%87%E6%95%B0

    thi = ...

    res_thi = {"thi": thi}
    edgeID = get_param_from_event(event, 'edgeId')
    payload = {
        'tenantId': TENANT_ID,
        'edgeId': edgeID,
        'payload': res_thi,
        'qos': 1
    }
    # My-IoT edgeにメッセージ送信
    res = boto3.client('lambda').invoke(
        FunctionName=MQTT_API_NAME,
        InvocationType='RequestResponse',
        Payload=json.dumps(payload)
    )
    # API URL呼出に対する返値
    result = {
        'error': 0,
        'message': 'Sent a message to edge.',
        'data': res_thi
    }

    return make_response(response['statusCode'], result)
# EOF
このプログラムでは、大きく以下の順序で実行されます。
lambda_handler()から実行を開始。
My-IoTデータストアを検索する際に必要なコネクタID(引数)をチェック
温度と湿度の最新データをMy-IoTデータストアから取得
不快指数を計算
エッジID(引数)を持つエッジに不快指数を送信
上記の4.は、Pythonプログラムの下方にある
thi = ...
の部分で計算します。 プログラムの温度や湿度を表す変数を調べ、 「2.2. システムの動作」で示した 不快指数の計算式を完成してください。
6.2. PythonファイルをZIP形式で圧縮
クラウドアプリをクラウドで実行させるには、My-IoTストアに登録する必要があります。 その際、登録はZIP形式のファイルで行います。 そこで、作成したPythonファイルをZIP形式で圧縮します。
クラウドアプリの圧縮(コマンドプロンプトでの例)
C:\myiot>zip cloudapp.zip cloudapp.py
  adding: cloudapp.py (172 bytes security) (deflated 55%)
注意
zipコマンドが無い場合は、別途圧縮・展開ソフトウェアをインストールしてください。 Windowsの場合はExplorerを使ってZIP/UNZIPできます。
6.3. クラウドフォーメーションファイルをYAML形式で入力
クラウドアプリケーションをクラウドコンピュータにインストールするために必要な設定ファイルです。 クラウドアプリを実行する際のクラウドの仕様や各種APIの設定、アクセス権限の設定などを行います。 初級編では記述内容の説明を省略します。
AWSTemplateFormatVersion: "2010-09-09"
Description: An AWS function.
Resources:
  ###################################################################
  # Lambda Function
  myiotlm:
    Type: "AWS::Lambda::Function"
    Properties:
      Description: ""
      # file: cloudapp.py
      Handler: cloudapp.lambda_handler
      # DO NOT EDIT THIS 1 LINE
      Role: "arn:aws:iam::946501391975:role/sip-sample-lambda-role"
      Runtime: python3.7
      MemorySize: 128
      Timeout: 30
      FunctionName: "myiot-lm"
      Environment:
        Variables:
          # DO NOT EDIT THIS 1 LINE
          ES_ACCESS_LAMBDA: myiot-rel-es-access-lambda
          MQTT_LAMBDA: myiot-rel-publish-mqtt-lambda
          SUBSCRIPTION: 'ex/{}/alert'

  ###################################################################
  # ApiGateway
  RestAPI:
    Type: AWS::ApiGateway::RestApi
    Properties:
      Description: "myiot RestApi"
      Name: "myiot-apigw"

  RestAPIDeployment:
    Type: AWS::ApiGateway::Deployment
    Properties:
      Description: ""
      RestApiId:
        Ref: RestAPI
    DependsOn:
      - RestAPIMethod
      - RestAPIResource

  RestAPIStage:
    Type: AWS::ApiGateway::Stage
    Properties:
      RestApiId:
        Ref: RestAPI
      DeploymentId:
        Ref: RestAPIDeployment
      StageName: "myiot-stage"

  RestAPIResource:
    Type: AWS::ApiGateway::Resource
    Properties:
      PathPart: "{proxy+}"
      ParentId:
        Fn::GetAtt: RestAPI.RootResourceId
      RestApiId:
        Ref: RestAPI

  RestAPIMethod:
    Type: AWS::ApiGateway::Method
    Properties:
      HttpMethod: ANY
      AuthorizationType: NONE
      RequestParameters:
        "method.request.path.proxy": true
      Integration:
        CacheKeyParameters:
          - "method.request.path.proxy"
        CacheNamespace:
          Ref: RestAPIResource
        IntegrationHttpMethod: POST
        Type: AWS_PROXY
        Uri:
          Fn::Sub: "arn:aws:apigateway:${AWS::Region}:lambda:path/2015-03-31/functions/${myiotlm.Arn}/invocations"
      ResourceId:
        Ref: RestAPIResource
      RestApiId:
        Ref: RestAPI

  ###################################################################
  # LambdaPermission
  LambdaPermission:
    Type: "AWS::Lambda::Permission"
    Properties:
      Action: "lambda:InvokeFunction"
      Principal: "apigateway.amazonaws.com"
      FunctionName: !GetAtt myiotlm.Arn

#EOF
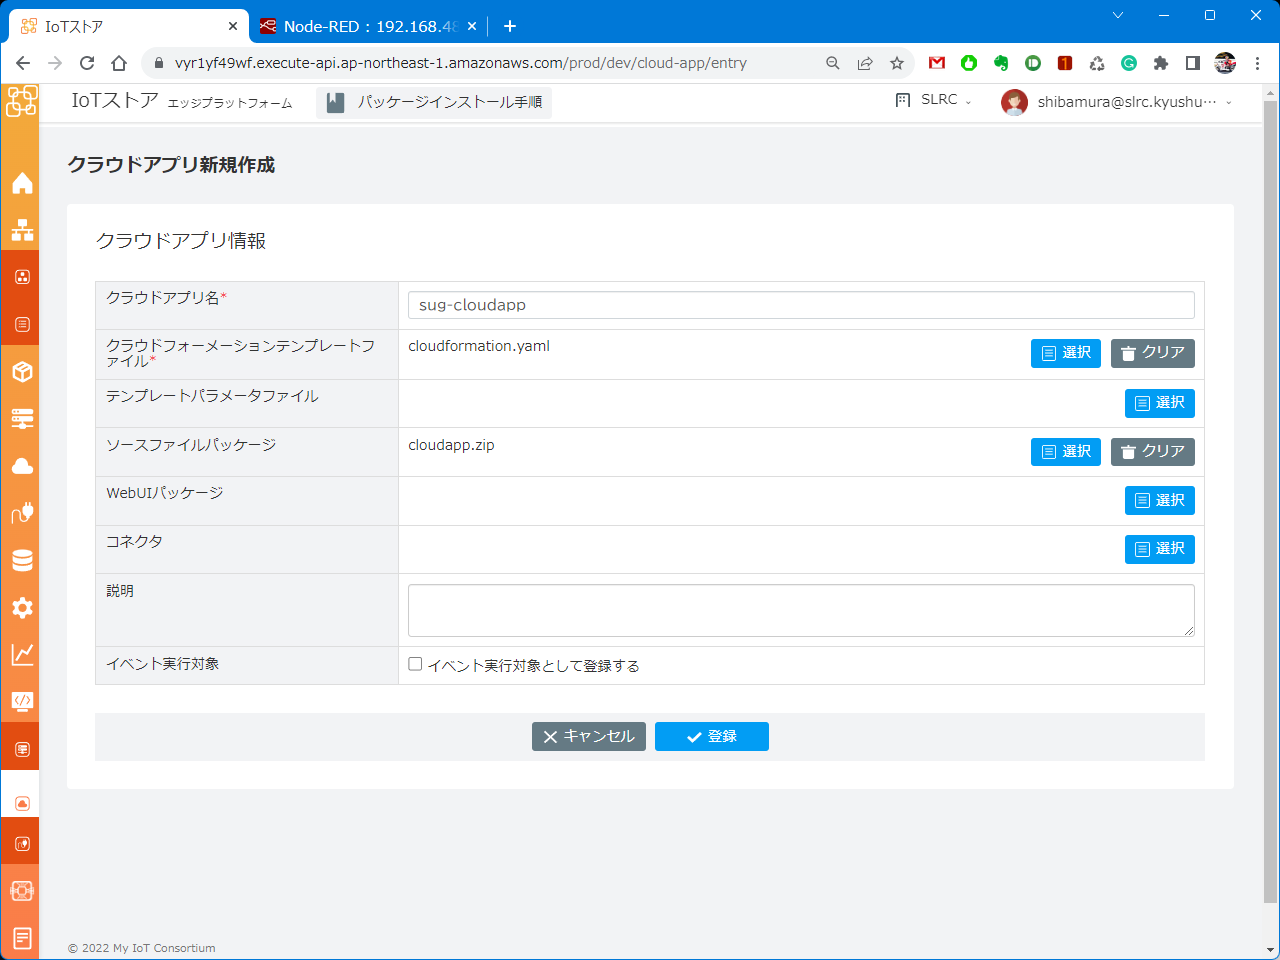
6.4. クラウドアプリ登録
クラウドアプリ(ZIP形式)とクラウドフォーメーションファイルをMy-IoTストアに登録します。
WebブラウザからMy-IoTストアにアクセスし、左サイドバーから
開発⇒クラウドの順にクリックします。「クラウドアプリ一覧」の右上
新規作成をクリックします。「クラウドアプリ情報」内に各種設定を入力します。
「クラウドアプリ名」: 任意の名称を入力(例:sug-cloudapp)。
「クラウドフォーメーションファイル」:
選択をクリックし、cloudformation.yamlを選択。「ソースファイルパッケージ」:
選択をクリックし、cloudapp.zipを選択。

登録をクリックしてクラウドアプリをMy-IoTストアに登録(アップロード)します。
以上で、クラウドアプリ開発は終了です。
エッジアプリ開発のポイント
クラウドアプリを記述(Python)
クラウドアプリファイルのZIP化
クラウドフォーメーションファイルを記述
クラウドアプリをMy-IoTストアに2.と3.を登録